Friday, November 5, 2010

Blogging may be overrated...

....either that or I'm just busy busy busy.  I enjoy blogging, so I think I'll go with the latter.

Well, the month of October is gone.  I had a Halloween Stamp Class and made a few treat holders and a card.  All similar to things other stampers are showcasing.  So much fun to make....I just haven't photographed them yet....one day....one day.....

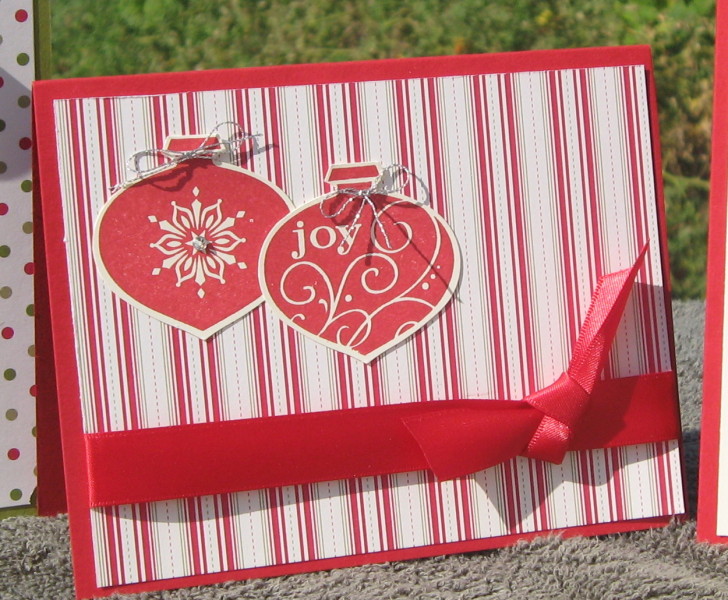
I do have a few cards to show though.  I made a stack of cards for an auction that was raising money for a local charity.  I'm all about themes.  Before creating my first card, I had to come up with something that tied all the cards together.  I knew I couldn't keep them all the same color; so I went with a floral theme.  Every card showcased flowers in one way or another. 

Card #1:  Simple with a touch of elegance.  I could stamp a zillion cards like this.  I (heart) them greatly.


Card #2:  I'd been dying to try out the quilted look.  Such a great way to use up those scraps we all hold onto!  I liked this technique so much that I also taught my Stamp Club girls how to do it too!


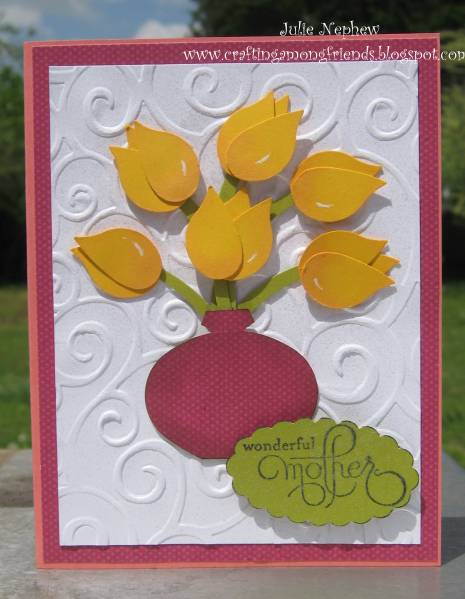
Card #3:   I've created these tulip flowers before, but still love them.  Fairly simple to create but still pack a big elegant punch!  (haha, get it, PUNCH - since they are created with the 2-step bird punch!...so funny)


Card #4:  Who can resist a big ol' bow!?!?!  I dream in Rich Raspberry.  This is one of my favorite colors!


Card #5:  You may be asking yourself, "Ok, where are the flowers??"  I was reaching a bit here and therefore decided that a branch could potentially be from a flowering bush!  If that isn't good enough, well the bird is made from flowery designer card stock.  Work with me people! 


Card #6:  I learned this technique from a scrapbooking convention I went to in August.  Sew simple but so darn cute!  I love the shabby quality of the card from the frayed edges of the fabric.

I included two additional cards in the auction, but I've already featured them on this blog.  So, figured why bore you with some oldies.   I bore you enough with my rambling. 

Hope you all have a fabulous day and find a little inspiration to make your hobby into a way of giving back!  Happy Stampin!!

Wednesday, September 1, 2010

I Care

Last night, my dear hubby and I took the kids to see his grandma, Grandma Jones.  She is in poor health, and we were basically there to say our goodbyes.  At 88 years old, Gma Jones has seen and been through a lot.  Although she is a quiet woman, her quick wit is one of my favorite qualities she possesses. Gma Jones has struggled over the last few years but is a strong woman.  She doesn't complain even after falling and breaking her hip last year.  She is a fighter.  Last night, after looking over her extremely worn Bible, I realized there is so much about Gma Jones that I don't know.  Michael and I have only been married 5 years after all.  It makes me look at my own family and gives me the desire to ask questions...lots of questions about our history, our lineage, our story...


I made this card a few weeks ago and as I was looking at its image was just a bit inspired by the tag....because I care...Simple words, but can really pack a punch when heart felt.

Hope you have a blessed day.

Tuesday, August 31, 2010

Time flies....I even "celebrated" Christmas while I was gone!

I can't believe its been almost 2 months since my last post!  Life happens I guess! 

Well, I'm back and have a ton of things to share.  I may have stopped blogging for a bit, but I definitely didn't stop stamping!!  This month, I actually went to a scrap booking convention with my wonderful sister-in-law.  We spent two days being crafty and learning new techniques.  LOVED IT!

So, on to sharing a card....or two :-)

Last weekend, my dear friend Jamie (aka other friend among the crafting here on this blog who is even worse than me in actually posting a project!) invited us over for her son's birthday party.  I decided a little cash was in order, and therefore, a cash holder was needed.

At the scrap convention, I learned a fun way to fold my cards and I think I'm going to be addicted for a bit...oh well...its fun and all.  Here is the card folded up.


And here is how the card looks when it is opened.  I thought it was a perfect way to hide some $$$.


Back in July, I also had some fabulous girls over for a Christmas in July Stamp Class.  We made a few cards, decorated a candle, and made some gift tags.  We had a ton of fun.  I hope to have another class in October. 

Here are the projects we made for the class.  Of course, we had to make everything with our theme in mind...Christmas!

Card #1

Card #2


Card #3


Gift Tags


I didn't take a picture of the candle, but everyone got so creative with theirs.  It was their chance to think outside the box a little.  Many included rhinestones on theirs.  They were all beautiful!

Products Used on Birthday Card:
Stampin Up Cardstock, Hostess Level 3 Stamp Set - Playful Pieces
Colors include: Crumb cake, Cherry Cobbler, Daffodil Delight, Marina Mist, Chocolate Chip

Products Used on Christmas Cards/Tags:
Stampin Up Cardstock, Delightful Decorations Stamp Set, Ornament Punch, Stampin' Up Rhinestones, Ribbon, Scallop Oval Punch, Large Oval Punch, Pop-up dots, Two Tags Bigz Die
Colors include:  Really Red, Old Olive, Very Vanilla, Crumb cake


Friday, July 9, 2010

CASE a CAS

For those not up on the lingo....CASE = Copy & Share Everything while CAS = Clean & Simple

It took me a while to realize these abbreviations were not the same thing.  One day I saw someone say a CASE'd CAS and I was beyond confused.  So, after a little searching on Mr. Google, I discovered their true meanings! 

For my club last month, one of our cards was just that, a CAS which I CASE'd from Mary Brown.


I changed up the colors and ribbon a bit, but overall it has a similar feel.  Everyone enjoyed making it.  I think the smearing of ink on card stock is such a neat technique but can be a little scary when you are first attempting it.  Basically, you just go for it and if it messes up....start over.  No harm, no foul.

I used the Four Square stamp set,  which retired last month, along with Chocolate Chip ribbon, Old Olive, Really Rust, Chocolate Chip, and Not Quite Navy card stock, and Chocolate Chip & Really Rust ink pads.

I'm working on my Christmas in July Class and hope to have some of those projects posted soon!  Stay tuned! 

Happy Stampin!

Wednesday, July 7, 2010

Surprise...or close to it!

Yesterday I mentioned in my post that we celebrated my mother's 60th birthday with a surprise party.  Well, we tried to keep her away all day, but she came home an hour before the party started.  Normally this would make me sad, but she was still completely surprised to drive up to a decorated driveway full of tables, chairs, and a few streamers.  The best part was seeing her face when she saw her sister and brother come walking out of the house.  They both live in other states and came to town just for her party!!  Oh so special, fun, and surprising :) 

To prepare for the party, my main job was to get the invitation made and sent out.  So....I just had to use the Stampin' Up My Digital Studio program.  This was my 2nd or 3rd invitation using the program, and I'm still in love with it!  A normal person could make this card in about 10-15 minutes.  Since I don't consider myself normal, it took me about 1 to 1 1/2 hours.  I just kept playing with different options which is probably one of the coolest parts of the program...there are soooo many options!

I know I know...I'm rambling and you just want to see the invitation :)


The invitation was printed 4 to a page on 8 1/2 x 11 white card stock and mailed as a postcard.  For those guests whom I had email addresses for, I simply emailed them the invitation as an attachment.

I need to start using MDS for scrap booking now since I've mastered the whole card making side of things.  Hmmm...what picture should I start with....decisions decisions.

Happy Stampin!

Tuesday, July 6, 2010

Black Magic in Not Quite Navy...so for me Navy Magic?

I must say, the past few days are a complete blur.  Our family surprised my mother on Friday for her 60th birthday.  Between coordinating her being out of the house, setting up tables, decorating, chopping food etc etc and serving about 100 people, the day was a long one, but TOTALLY worth it.  My mother is a total jewel and I appreciate her so much.  I know you all probably have wonderful mothers as well, but mine is just a bit more awesome than any other...ok yes, I am totally biased.

I made her a bday card using the black magic technique and of course in all the rush of things forgot to take a picture of it.  So, instead I'll share a card I made for Jamie (aka girl in the photo with me who hardly EVER blogs but I still *heart* her).  For my mom's card, I actually used black card stock but for Jamie's I felt like it would be too much contrast with the DS paper I picked out.  So, I went with Not Quite Navy. 


Steps to Create the Cuteness:
1.  Stamped the Inspired by Nature flowers using white craft ink and let dry...well..or get impatient and use a heat gun to speed up the process.
2.  Color image with SU colored pencils starting with the lighter colors and working my way out to the darker tones.
3.  Use a white gel pen to create extra highlights around the flowers and leaves/stems. 
4.  After cutting out my DS paper, flip it over repeatedly in trying to decide which side I like best. 
5.  Cut off bottom half of my stamped card stock in realizing it won't all fit on my card.  I even contemplated slicing through the whole thing to create that cool effect that some people do, but I was simply to scared to do it after all that coloring.
6.  Add a so saffron bow to make it even more cute, but I'm still not totally satisfied with how my bow tying came out.
7.  Take a deep breath, and glue it all down.

Jamie loved the card.  Mom loved the card.  I love the technique and will probably have to demo it at my next club meeting.  Oh so fun.

Happy Stampin'!!

Products Used (All Stampin' Up):
DS Paper (Retired), Colored Pencils, White Craft Ink, White Gel Pen, So Saffron Ribbon (Retired) 

Tuesday, June 29, 2010

A Punch of Baby

A few posts ago, I showed off my MDS shower card for my friend Lisha.  Well, the shower went well (thanks for asking), and little Joshua should be born very, very soon.

I created this card to accompany her shower gift.  I CASED the cute baby from Ellen Kemper) but didn't have all the right punches.  So, I had to improvise a bit, but overall I like the way my cute, chubby baby turned out.  Another little tidbit about the baby...I used a SU marker for the skin!  Blushing blossom to be exact.  Most stampers use the blushing blossom card stock, but since I had none, I improvised with Whisper White card stock and a marker.


The rattle is punched out and the handle is from Something Sweet stamp set that will be in the new catalog.  The 'baby' is from the Tiny Tags stamp set.

Just 2 more days until the catalog is officially OUT!  I have made so many lists of items that I want, but I think dear hubby might not like the bill!  So, I'll just have to pace myself....I hate pacing myself....but I will.......kinda.

Happy Stampin!

Monday, June 28, 2010

MOJO Monday 144...a week late :)

I actually made this card last week as part of the MOJO Monday sketch challenge but haven't had time to blog about it.

This is the FIRST time I've ever in my entire life participated in a sketch challenge, and I give it two big red nail painted thumbs up.  What a fun way to look at my supplies and figure out how to make it work :)   I think I MIGHT be hooked....maybe...

So, here is this sketch...

And here is interpretation with my sweet hubby's birthday card that I made with my own two hands :) 


I used the new colors from SU which will be available July 1st.  I fell in love with these colors while they were in my hands, but as I used them, I realized that my fondness for their beauty was actually deeper than love...I think it may turn into obsession....and I'm ok with that :)  My picture really doesn't do these rich colors any justice....so just trust me...the yellow, the red, the blue etc etc.  GOR-GEOUS!

I used the four square stamp set which is retiring Wednesday night.  I must say, this set is actually a quiet jewel in my collection.  I ignored it over and over again only to discover it last month and realized...I kinda love her...only to find out she will be gone soon.  Oh well...I still love her.

If you would like to place a LAST CHANCE order, you need to do so by JUNE 30th.  Please go to my website at http://www.julienephew.stampinup.net/ or email me at julienephew@gmail.com .

Happy Stampin!

Products Used:
SU Card stock in Early Espresso, Daffodil Delight, Cherry Cobbler, Crumb Cake (aka Kraft), Whisper White, & Marina Mist; Whisper White 5/8 Inch Organza Ribbon, Punch Pack Set, Round Tab Punch.


Saturday, June 26, 2010

Shoes always make the difference

Although this card didn't USE the shoe stamp in Humor in High Heels stamp set, I think the adorable dresses imply that cute shoes are in order!

This set brings to mind the Boys II Men song, "It's So Hard to Say Goodbye," simply because Humor in High Heels is retiring in a very few, very short, couple of days.  Lets all take a moment....


....ok...moment over....

I used some retired SU DS paper, stamped it on two coordinating papers, cut it out with my wonderfully awesome paper snips, stamped dresses on white card stock, glued DS cutouts onto white stamped paper, and this is now officially the longest run on sentence!

I also used the new border punch and corner punch to make a cute background square.

I'm looking forward to the new catalog, new colors, new fun stamps, and new ideas!

Happy Stampin!

Wednesday, June 16, 2010

Inexperienced Pastel User Alert

Today's card is brought to you by my lack of knowledge/experience with pastels.

With becoming a Stampin' Up Demonstrator, I found you get quite a few perks.  Besides the extra income, my starter kit is one of the best perks of all!  I was able to pick out some adorable stamp sets and increase my stampin' supplies as well. 

One of the supplies included in that lovely kit is the Stampin' Up Pastels.  I've never stamped using pastels, and I was a little worried that I would fail...horribly fail...but...I don't think I failed at all!!  I read up on how to use the pastels with Versa Mark Ink and tested things out.  After playing for a bit, here is the card I created.

Yes, I will fully admit I am addicted to the Top Note Die AND the Inspired By Nature stamp set.  Totally addicted....and I don't care...

I know there must be additional ways to use the pastels, and I fully intend to pursue those techniques as well.

I love the rustic nature of how it all turned out too.  Yeah me in learning a new technique.  Go Team Julie!  hehe.

Happy Stampin!

Products Used:  SU Pastels, Chocolate Chip Card Stock, Regal Rose Ribbon, Inspired by Nature Stamp Set, Chocolate Chip Ink Pad, Versa Mark Ink Pad, Silver Brads, Scallop Oval Punch, Top Note Bigz Die

Tuesday, June 15, 2010

Shower Time with MDS

FYI...MDS = My Digital Studio...

My sweet friend Lisha is having a baby next month.  I'm so incredibly excited for her!!  Babies = showers so me, Jamie, and some other lovely ladies from our church put together a small shower to help Lisha and the baby with all those day to day needs of a new born. 

Guess what my contribution was??  Seriously...you have to ask?? 

Of course, I made the invitation!!


I removed some information to protect privacy.

The card was printed on 5 1/2" x 4 1/4' cream card stock and mailed as a postcard.  I was able to create the whole thing in about 30-45 minutes (most people it would probably take less, but I tend to play around a lot with MDS) and I only used images that came with the original software.  Although, there are a ton of adorable downloads available on Stampin' Up.Com, I love the fact that you can still make amazing projects with just the program itself. 

If you have any questions about this project or would like more information, please feel free to email me at julienephew@gmail.com.

Happy Stampin'!


Sunday, May 30, 2010

Watercoloring..only....not really...

When I first looked through the Summer Mini Catalog, I realized two things:  1.  I want them all!!  & 2. I won't be able to get them all!! 

After dealing with the sadness that followed realization #2, I quickly made my wish list.  Besides the adorable Sweet Scoop set and the too cute First Day stamp set, I also knew that I NEEDED the Watercolor Trio stamp set.  I love sets that allow you to use them in so many ways. 

In playing with the set, I created this card...


Cute Right?

Ok, so used Stampin' Up Markers to color the stamps and stamped the greenery twice to leave a subtle variance in colors.  Add in some brads, ribbon, and a Thank you sentiment and you have a simple yet beautiful card.

Products Used:
Old Olive Card Stock (#100702), Whisper White Card Stock (#100730), Rose Red Ribbon (#111366), Water Color Trio Stamp Set (#120084), Silver Brads (#104336), Rose Red Marker, Regal Rose Marker, Summer Sun Marker, Certainly Celery Marker, Wild Wasabi Ink (coming in July), Top Note Bigz Die (#113463)


Simply Sunflowers

I was a bit stressed out for my first Stamp Club meeting.  Would the projects be fun enough?  Easy enough? Challenging enough?  Etc etc etc...

Well, this card was simple enough but still had some some techniques that not everyone had tried before.  I first saw a similar version by another Stampin' Up Demo and just loved it. 


I'm a bit addicted to sponging around edges of almost all things card making.  Whenever I think a card needs a smidgen of tweaking....it pretty much ALWAYS includes sponging around the edges.  Instead of adding a mat around a project, this technique allows a bit of contrast, but still gives a soft texture to the card.  I love it.

If you have any questions or would like to place an order, feel free to email me at julienephew@gmail.com or go to my  Stampin' Up website.

Products Used:  Chocolate Chip Card Stock (#102128), Very Vanilla Card Stock (#101650), More Mustard Card Stock (#100946 ), Black Card Stock (#102851), Chocolate Chip Ink (#100908) , Always Artichoke Ink (#105219) , Always Artichoke Ribbon (#109035), White Gel Pen (#105021), Glue Dots (#103683), Large Oval Punch (#107305), Scallop Oval Punch (#114889), Water Color Trio Stamp Set (#120084), Top Note Bigz Die (#113463)

Friday, May 21, 2010

I scream, you scream, we all scream for ICE CREAM!

I must say, Sweet Scoops stamp set, (in the new Summer Mini) is one of my favorites.  It is so cute and fun!  This was my first Club card that the girls made.  Everyone loved it, but I did learn one very import thing....keep it simple...there were way too many steps in creating this card, but it doesn't take aware from the cuteness, right? 


I used the kissing technique to achieve the marbled ice cream.  This was a new technique for most of the girls in my group.  On a funny note, when I first saw this stamp set, my only question was, "why do we need a square of wood grain with this set?"  I was so confused until I saw it used to marble the ice cream.  SILLY ME!!

If you have any questions about this project or would like to place an order, feel free to email me at julienephew@gmail.com.  To place an order online, check out my site at http://www.julienephew.stampinup.net/

Happy Stampin!

Products Used:
SU Designer Paper,  SU Close to Cocoa Card Stock #101341,  SU Whisper White Card Stock #100730,  Rose Red Ribbon #111366,  Paper Piercer #116631,  Mat Pack #105826,  Sweet Scoop Stamp Set (CM) #120078,  Chocolate Chip Ink Pad #100908,  Close to Cocoa Ink Pad #103139,  Rose Red Ink Pad #101778,  Regal Rose Ink Pad #105211,  Pink Pirouette Ink Pad (coming in July),  White Gel Pen #105021

Thursday, May 20, 2010

Hostess Gift

Well, my first Stamp Club was this month, and I think everyone had a good time.  There was lots of laughter and everyone seemed to like the projects we made. 

Stephanie was my hostess, so I made her a little thank you gift for opening her home to our crazy group of girls.


Using the Scallop Envelope Die and Big Shot, I cut out 4 envelopes and formed this cute box.  Add in some decorative paper, punches, and designer brads to complete the look.  It is the perfect size to hold some 3x3 note cards.  I used coordinating designer paper, and a thank you stamp to finish of the cards.


I added some designer paper to the bottom of the box as a cute accent.  It looked a tad boring before adding the paper, plus it gave the box a smidgen more stability.

I've been lazy in posting my recent projects, but will be posting more soon!

If you would like to place an order, check out my website or email me at julienephew@gmail.com

Happy Stampin!

Products Used:
Scallop Envelope Bigz Die #113462
SU Designer Paper (retired)
SU Ruby Red Card Stock #102030
Scallop Oval Punch #114889
Large Oval Punch #107305
Boho Blossoms Punch #110711
Filigree Designer Brads #112577
Elegant Thank You Stamp #114484

New Design

I've been messing around with My Digital Studio for a week now, and I must say.... I *heart* it!

Seriously... *hearts* galore!

With tinkering around, I ended up redesigning the layout of this blog and created a new header with some of the backgrounds/embellishments that come with the program.  It was fun and easy and addictive.  Hubby was getting a bit annoyed with my late nights, but after seeing my finished product, I think he understood my obsession was well worth the lack of sleep.  :)

Now, I'm going to work on making scrapbooks since its been a while...ok...a LONG while since my pictures were touched for scrap booking.  This program will save the day!!

If you would like more information about My Digital Studio or any other products, please feel free to email me at julienephew@gmail.com.

Happy Stampin!

Monday, May 10, 2010

Scrapbooking

May is National Scrapbooking Month. To celebrate, Stampin' Up is giving aware adorably cute, designer brads with a purchase of selected scrapbooking items. Included in this promotion is the My Digital Studio (#118108), which my fabulous hubby "bought for me" as a mother's day present. I've played around with the program some and can't wait to have time to do more and more with it. There are so many options - web design (which I'm totally going to rock my blog out with!), card making, scrapbooking, calendar making, VIDEOS! Seriously, this isn't your average crafting software.

Since I purchased the software THIS month, I was able to also pick out, these cuties!


I used them on my hostess gift for tonight's stamp club. OH SO CUTE! I'll blog about the gift tomorrow.

If you would like more information on this month's promotion, just click away....


If you would like to place an order, feel free to email me at julienephew@gmail.com or go to my website.

Saturday, May 8, 2010

Appreciating Teachers

This week included Teacher Appreciation Day. I've been wanting to make a name frame for some time now and figured this would be a great time to give it a try! I planned on doing more, but only had time for my small show of thanks. I used the stamp set, First Day, from the Summer Mini Catalog to decorate the piece and give it a "teacher" feel. I love that cute little bookworm. I know this set will come in handy for many, many more teachers to come!!


If you would like to place an order, please visit my site.

Products Used:
First Day (#120051-CM, #118521-WM)
Whisper White cardstock
SU Decorative Paper (Retired)
Frame I stole from the bookshelf....note to self...picture of mother needs new frame!

Friday, May 7, 2010

A cute card for a cutie turning 2!

My niece, Jenna, turned 2 on May 1st. I can't get enough of her! She is such a wonderful mixture of sweetness and ornery and love and diva. She is such a girly-girl with her love for bling and shoes! She melts me every time I see her sweet smile....even if she hardly will say my name....

I whipped this card out quickly. I saw a similar idea from a Stampin' Up demo site and loved the way it looked. Overall, I was happy with how it turned out and equally happy that it didn't take me 2 hours to create....yes, sometimes my cards take a while...including 'whoops' moments which happen often.


I love this cardstock. It's called Raspberry Tart (#113975) and is currently available in the Clearance Rack on the Stampin' Up site. You can find it by going to my site and click on store.

I just checked today and Stampin' Up added some new items to the clearance section. Some fabulous deals for some awesome products! The paper alone makes my day!!

Happy Stampin'

Products Used:
Raspberry Tart Designer Paper (#113975)
Whisper White Card stock (#100730)
1/4" Rose Red Grosgrain Ribbon (#111366)
Small Oval Punch (#107304)
Large Oval Punch (#107305)
1-3/4" Circle Punch (#112004)

Thursday, May 6, 2010

It's a boy....

....for my friend Amy... :)

A couple weeks ago, I attended a beautiful baby shower for my long-time friend, Amy. During our school days, she practically lived at my house. I'm so excited for her and her bundle of joy that is on the way.

So, with any baby shower, I had to make a card!!


I stayed clear of anything remotely resembling pink since I wanted to keep the card as boyish as possible. Although it took me longer than I would have liked on the sails, I love the way it turned out.I love the Tiny Tags stamp set. I was searching and searching for a sentiment to add to the front of the card. It was a real struggle until I looked at the Tiny Tags set. It was a light bulb moment for sure.
Products Used:
SU Decorative cardstock (retired)
Whisper White cardstock (#100730)
More Mustard cardstock (#100946)
Paper Piercer (#116631)
Mat Pack (#105826)
Brads
Red twine
Tiny Tags Punch (#117190)
Tiny Tags Stamp Set (118592)
1-3/4 " Circle Punch (#112004)

Monday, May 3, 2010

Summer is on its way!

I can't believe it is already May...time simply flies, doesn't it?

Since it's May, it means one very exciting thing.....the NEW STAMPIN' UP SUMMER MINI CATALOG!! (I know I know....calm down....nah, it's exciting...jump and cheer :) )

You can find an online copy of the catalog, here.

If you need to place an order, feel free to call me or jump over to my website.

Stayed tuned for cuteness coming your way via a little bookworm made special for my son's teacher and some ice cream scoops for an upcoming workshop. Oh so fun!!!

Tuesday, April 20, 2010

It's All in the Punch!

I'll just start off with...I'm so excited about this post! Not to toot my own horn, but I simply love how today's card turned out. Since I'm obviously all backwards with posting a Father's Day card BEFORE Mother's Day, I figured I should make all right in the world and post a Mother's Day card. I saw examples of this style card on several Stampin' Up Demo sites, so I will not sit back and take credit for the idea, but I did make it with my own two hands!

Stampin' Up Supplies you will need include: Ornament Punch, 2-Step Bird Punch, Scalloped Oval Punch, Large Oval Punch, coordinating card stock, ink, white gel pen, smooch spritz (available in the SU! Summer Mini Catalog)

I'll go ahead and show you the finished project first...


Ain't she somethin'? (had to get my Okie accent in a bit)

Ok, so on to my mini-tutorial of events in creating said card....

Using yellow card stock, punch out the bird wing on the 2-step bird punch a zillion times...or between 17-20 times...whichever you prefer.

Take 2 or 3 wing pieces and glue together to look like tulip buds. I used SU! glue dots to attach mine. Sponge contrasting ink at the bottom of the buds and a little up the sides of the flowers. I used Pink Pirouette which is an In Color coming back in the July SU! Catalog. I used the large oval punch to create the stems by punching out just a portion of the oval to create a natural curve to the stems. You could also use the 2-step bird punch leaves but I wanted my stems to have a bit more "meat" to them. Attached to the back of each bud with another glue dot.

The vase was so crazy simple. Using the ornament punch, line up your decorative paper, leaving off the bottom part of the punch, and punch out a cute little vase. I also sponged some complimentary color to the paper to give the vase more depth. Attach the vase to your card leaving an opening at the top for your flowers.

Next, arrange your flowers in the vase as you like and attach to your background paper using glue dots.

Other notes of interest....the background whisper white card stock has vanilla shimmer Smooch Spritz on it. The picture doesn't do the spray justice....I love love love how it made a pearlized look to the paper. The item will be available May 1st and is in the Summer Mini Catalog.

I also made another tulip and attached it with my sentiment to the inside of the card. Its all in the details, right?

Tonight I'll be making a couple more cards for baby showers and more birthdays...so stayed tuned. :-)

Happy Stampin!

Monday, April 19, 2010

Father's Day

Yes, I know its a bit early for Father's Day, but I was just too excited to share this card. I followed the tutorial on Tiearra Burbee's blog. (I don't know Tiearra but am totally in debt to her for this cute, cute technique.

I was extremely happy with the way my card turned out. I always look at the finished product and start thinking of ways to make it even better though. In this case, I think a solid card stock behind the shirt would help it pop a bit more against the background paper.

I crimped the light green strip of paper only to find it made the paper too short for the space. So, I had to flatten it out a bit, but there is still some cool texture to it.

The corduroy buttons are from the clearance rack at Stampin' Up's website. If you haven't looked through the site in a while, definitely look through the clearance section. There are some fabulous deals!!

Bonus fact is the button color is Pacific Point, which is a previous retired In Color, but thanks to the COLOR RENOVATION, will be back in the July 2010 catalog!

If you would like to place an order, simply click here.

Happy Stampin!!

Products Used:
SU! Pacific Point Card Stock (Coming back soon!!)
SU! Decorative Paper (Retired)
SU! Green Card Stock (can't remember which color though...sorry)
SU! Brads from Styled Silver Hodgepodge Hardware (#111325)
SU! Pacific Point Corduroy Buttons (#114341)
SU! Well Scripted Stamps (#117072)

Tuesday, April 13, 2010

Fond Farewell...

NOOO...don't get the wrong idea, I'm not leaving....

Jamie informed me that having a visual of retiring colors can be helpful. So here is a .pdf file & a picture that shows all the colors that are retiring.


As you can see, there are many colors we will be sending off to the big retirement home in the sky (or whereever it is that Stampin' Up Colors go) so don't miss out on your chance to have their beauties in your collection.

Click here if you would like to place an order!!

Happy Stampin!

Sunday, April 11, 2010

Yes I made a card :)

Julie will be so proud that I am actually blogging. Sorry to be a slacker, there just doesn't seem to be alot of time in the day for my addiction of card making. It's Sunday and I am making time to make a couple friend cards.

I love the hostess set "Out of the Box", so cute! I just ordered the ribbon off the clearance rack, it's the "Fairy Tale Ribbon". The three hearts are from the "Heart to Heart" punch. I love just starting and seeing where it ends up. The ink pads that were used are both from the new incolors: melon mambo and soft suede. The paper was also from the clearance rack and it's part of the "Rasberry Tart Designer Series".


Hopefully I will post again sooner than the last time.

Wednesday, April 7, 2010

Exciting News!

So, no new project to post from me today....but I do have exciting news! A couple things actually. I already mentioned it on my personal blog but forgot to get the word on this blog too!

I've joined forces with Stampin' Up and signed up to be a demonstrator. So exciting!! What a fantastic way to share my ideas and craftiness!! (well, at least I think so) I have visions of fun card making parties, workshops, tutorials...the options are endless. Stampin' Up has such great products. Besides paper crafting, they also have ventured into the areas of jewelry, home decor, and digital scrapbooking. The whole digital scrapbooking stuff is one area that I haven't ventured yet, but I'm excited to try!!

With this announcement, comes another. Its the COLOR RENOVATION! Stampin' Up announced that with the new catalog (release day JULY 1!!), will come new color families. Some colors are being retired, some are staying, some are brand new, and some previously retired In Colors are returning. So with that change, it is PRIME time to stock up on some of your favorite colors that are going to the retirement home. Don't be sad, they will be happy and comfortable...promise!

Here is a listing of the retiring colors.

Soft Subtles:
Pale Plum, Blush Blossom, Apricot Appeal, Barely Banana, Mellow Moss, Sage Shadow, Almost Amethyst, Lavender Lace

Bold Brights:
Glorious Green, Green Galore, Gable Green, YoYo Yellow, Only Orange, Pink Passion, Pixie Pink, Orchid Opulence, Lovely Lilac, Brilliant Blue

Earth Elements:
Close to Cocoa, Creamy Caramel, Really Rust, Ruby Red, Cameo Coral, Summer Sun

Rich Regals:
Bordering Blue, Brocade Blue, Ballet Blue, Taken with Teal, Handsome Hunter

Looking through these colors, I realize there are a few I MUST get before they retire. My list of NEEDS (not wants....I think I really NEED these!!) include:

Almost Amethyst (Item# 101723)- such a lovely shade of purple/lavender. It is a pale color and will be gorgeous on any spring card or pretty Easter scrapbooking page.

Blush Blossom (Item #102609) - perfect color for a peachy skin tone. I have the watercolor marker, but I think the ink cartridge would be a good investment for times I'm making mass quantity of cards.

Brilliant Blue (Item #100691) - a truer blue than any other ink in the family. I think it will come in handy.

Summer Sun (Item #100537) - there is just something about this yellow that makes me happy. Its just so sunny and cheerful!

Taken with Teal (Item #103257) - I'm in love with this blue-green color. Its like something from under the sea.

I'm definitely putting these pretty babies on my shopping list for the next few months. Plus the re-inkers....just to make sure I don't run out of their beautiful shades!

If you would like to place an order, feel free to check out my site http://www.julienephew.stampinup.net/ or email me at julienephew@gmail.com!

HAPPY STAMPIN!!

Tuesday, March 30, 2010

Birthday #3

My card today brings the birthday extravaganza in our house to a close...at least for this month. It seems like my hubby's whole family was born in the spring months....well, most of them anyway. So, I'll probably have another birthday extravaganza for April too.

So, Michael's dear, sweet mama. She loves to garden, so I figured a nature scene would fit her well.


This set from Stampin' Up is called Branch Out and is one of my favorites! Sadness that it recently retired but it will not detour my love! Hehe.

I sponged some light blues in the background to give it a little depth. Sometime was missing, so I added in a touch of sun glow with yellow ink towards middle of the card. I added a little birthday sentiment to the inside by stamping it on the polka dot paper and adhering it to my card stock. I almost messed up ROYALLY in my placement of the paper. I small shriek came out when I realized that I started to glue it horizontally instead of vertically. Thankfully, I was using some repositionable glue. THANK HEAVENS!!

Products Used:
SU Decorative Paper
SU Whisper White Card stock
SU Chocolate Chip Ribbon
SU Inks & Markers

Sunday, March 28, 2010

Birthday #2

Yesterday was Shelby's 15th birthday. It seems crazy to think our "little" girl is going to be driving soon. Shelby had some friends spend the night. Her main request was to eat at Taco Bell (so love the girl for unknowingly protecting my pocketbook!) and "hang out" at Wal-mart. I told the girls I was fine with the whole Wal-mart hang out deal as long as they didn't do anything that would cause them to get kicked out. They responded with, "Ok, I guess no hide 'n seek." Seriously???

So, on to the card....


I tried to keep the card somewhat simple and avoided pink. Lately, I've been using a ton of pink and turquoise in my cards, and Shelby just ain't much of a pink kind of girl. I wasn't sure how her card would turn out, but was pleasantly surprised with it all came together.

Next card I'll be sharing is for my mother-in-law's birthday. I'm so, so, so happy with how it turned out. You know how sometimes you look at a creative project and just go "...ya...I made that..." with a hint of pride? Well, that was my moment. I'll post the pic tomorrow.

I'll close this post with the ever poetic words of Casey Kasem "keep your feet on the ground and keep reaching for the stars".....ya, I'm not quite sure what it means either.

Products Used:
Gina K Stamp Set
SU Punches
SU Decorative Paper
Random Red Ribbon
SU Whisper White Card Stock
SU Markers
SU Watercolor Pencils
SU Blender Pens

Wednesday, March 24, 2010

Birthday Extraveganza

My kids birthday's are both in March....a week a part....well...6 years and a week. Luckily, they have gotten used to celebrating birthdays together. Its difficult getting families together two weeks in a row!

So with birthdays, of course I had to make cards! I tried to make Austin's as ungirly as possible. He opened the card with the response of, "COOL!" So, I guess I accomplished my goal. :) Here is a pic of the card.


And a picture of the birthday and his goofy grin.


I think he had a great 9th birthday including a surprise party and a sleepover with his best friend.

I'll save Shelby's card for my next post since the gal technically hasn't had her birthday yet.

Products Used:
Random Decorative Paper
SU Whisper White Card Stock
SU Inks & Markers
SU Greets, Earthlings Stamps
Light Green Brads
Corner Punches

Monday, March 8, 2010

Babies!!

Last week, our Sunday School class had a breakfast fellowship for a couple in our class having their second child. Normally, we have a diaper shower where everyone brings diapers for the parents...well...for the baby but we hand them to the parents. (haha) Taking note from my ever so smart sister-in-law, I decided to forgo purchasing a certain brand of diaper and opted for a gift card instead.

What a great excuse to make a cute card! So here it is...


I have a new love...my paper crimper. I picked it up at Hobby Lobby a few weeks ago and keep finding little items to crimp. I never knew a $20 purchase (plus 40% off coupon) could make me so happy. The light blue paper on this card was crimped. I love how it gives just a little extra texture to the card.

I used SU punches for the baby and sentiment. I also pierced the paper around the scalloped circle. After adding a cute pink ribbon, I still felt like something was missing and decided to add a bit more by punching a strip of pink paper.

Overall I like the card. It wasn't perfect in my eyes, but then again, they never are.