Friday, July 1, 2011

It's been a while...a long while.

Although it may appear as if I dropped off the planet, this is definitely not the case.  I have tons of pictures to share on various projects, but the problem is finding the time to actually sit down and write about them.  And not only that, but also be somewhat entertaining/amusing/ inspiring during the process. It is a lot of pressure, I tell you!! 

So, with that being said...I'm going to try harder at documenting my creative side to share with the world...or with the 3 people who MAY stumble across my blog.  :-)

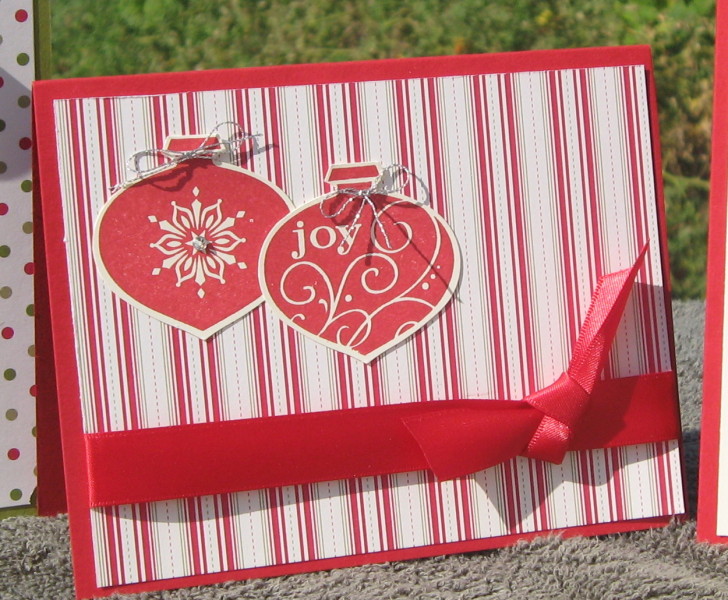
Jamie had a bday, so I made her a card.  I think it turned out cute. 


I normally stay clear of bright, bold colors only because I find them intimidating.  I them, but just never feel like I fully pull them off.  Well, Jamie is a bright color kind of gal, so I had to just go with it, and honestly, I love the results!  The new 3-layer punch is so much fun and so easy to use!  Definitely a favorite.

The new catalog came out today too!  My first glance through it, I was excited on a small handful of items but by my second and third glance, my list is huge!  Looking at all the cute ideas just gets my creative side pumping!

Well, that's it from me for today.  So today is day 1 of blog recovery.  Stay tuned!!  :-)

Friday, November 5, 2010

Blogging may be overrated...

....either that or I'm just busy busy busy.  I enjoy blogging, so I think I'll go with the latter.

Well, the month of October is gone.  I had a Halloween Stamp Class and made a few treat holders and a card.  All similar to things other stampers are showcasing.  So much fun to make....I just haven't photographed them yet....one day....one day.....

I do have a few cards to show though.  I made a stack of cards for an auction that was raising money for a local charity.  I'm all about themes.  Before creating my first card, I had to come up with something that tied all the cards together.  I knew I couldn't keep them all the same color; so I went with a floral theme.  Every card showcased flowers in one way or another. 

Card #1:  Simple with a touch of elegance.  I could stamp a zillion cards like this.  I (heart) them greatly.


Card #2:  I'd been dying to try out the quilted look.  Such a great way to use up those scraps we all hold onto!  I liked this technique so much that I also taught my Stamp Club girls how to do it too!


Card #3:   I've created these tulip flowers before, but still love them.  Fairly simple to create but still pack a big elegant punch!  (haha, get it, PUNCH - since they are created with the 2-step bird punch!...so funny)


Card #4:  Who can resist a big ol' bow!?!?!  I dream in Rich Raspberry.  This is one of my favorite colors!


Card #5:  You may be asking yourself, "Ok, where are the flowers??"  I was reaching a bit here and therefore decided that a branch could potentially be from a flowering bush!  If that isn't good enough, well the bird is made from flowery designer card stock.  Work with me people! 


Card #6:  I learned this technique from a scrapbooking convention I went to in August.  Sew simple but so darn cute!  I love the shabby quality of the card from the frayed edges of the fabric.

I included two additional cards in the auction, but I've already featured them on this blog.  So, figured why bore you with some oldies.   I bore you enough with my rambling. 

Hope you all have a fabulous day and find a little inspiration to make your hobby into a way of giving back!  Happy Stampin!!

Wednesday, September 1, 2010

I Care

Last night, my dear hubby and I took the kids to see his grandma, Grandma Jones.  She is in poor health, and we were basically there to say our goodbyes.  At 88 years old, Gma Jones has seen and been through a lot.  Although she is a quiet woman, her quick wit is one of my favorite qualities she possesses. Gma Jones has struggled over the last few years but is a strong woman.  She doesn't complain even after falling and breaking her hip last year.  She is a fighter.  Last night, after looking over her extremely worn Bible, I realized there is so much about Gma Jones that I don't know.  Michael and I have only been married 5 years after all.  It makes me look at my own family and gives me the desire to ask questions...lots of questions about our history, our lineage, our story...


I made this card a few weeks ago and as I was looking at its image was just a bit inspired by the tag....because I care...Simple words, but can really pack a punch when heart felt.

Hope you have a blessed day.

Tuesday, August 31, 2010

Time flies....I even "celebrated" Christmas while I was gone!

I can't believe its been almost 2 months since my last post!  Life happens I guess! 

Well, I'm back and have a ton of things to share.  I may have stopped blogging for a bit, but I definitely didn't stop stamping!!  This month, I actually went to a scrap booking convention with my wonderful sister-in-law.  We spent two days being crafty and learning new techniques.  LOVED IT!

So, on to sharing a card....or two :-)

Last weekend, my dear friend Jamie (aka other friend among the crafting here on this blog who is even worse than me in actually posting a project!) invited us over for her son's birthday party.  I decided a little cash was in order, and therefore, a cash holder was needed.

At the scrap convention, I learned a fun way to fold my cards and I think I'm going to be addicted for a bit...oh well...its fun and all.  Here is the card folded up.


And here is how the card looks when it is opened.  I thought it was a perfect way to hide some $$$.


Back in July, I also had some fabulous girls over for a Christmas in July Stamp Class.  We made a few cards, decorated a candle, and made some gift tags.  We had a ton of fun.  I hope to have another class in October. 

Here are the projects we made for the class.  Of course, we had to make everything with our theme in mind...Christmas!

Card #1

Card #2


Card #3


Gift Tags


I didn't take a picture of the candle, but everyone got so creative with theirs.  It was their chance to think outside the box a little.  Many included rhinestones on theirs.  They were all beautiful!

Products Used on Birthday Card:
Stampin Up Cardstock, Hostess Level 3 Stamp Set - Playful Pieces
Colors include: Crumb cake, Cherry Cobbler, Daffodil Delight, Marina Mist, Chocolate Chip

Products Used on Christmas Cards/Tags:
Stampin Up Cardstock, Delightful Decorations Stamp Set, Ornament Punch, Stampin' Up Rhinestones, Ribbon, Scallop Oval Punch, Large Oval Punch, Pop-up dots, Two Tags Bigz Die
Colors include:  Really Red, Old Olive, Very Vanilla, Crumb cake


Friday, July 9, 2010

CASE a CAS

For those not up on the lingo....CASE = Copy & Share Everything while CAS = Clean & Simple

It took me a while to realize these abbreviations were not the same thing.  One day I saw someone say a CASE'd CAS and I was beyond confused.  So, after a little searching on Mr. Google, I discovered their true meanings! 

For my club last month, one of our cards was just that, a CAS which I CASE'd from Mary Brown.


I changed up the colors and ribbon a bit, but overall it has a similar feel.  Everyone enjoyed making it.  I think the smearing of ink on card stock is such a neat technique but can be a little scary when you are first attempting it.  Basically, you just go for it and if it messes up....start over.  No harm, no foul.

I used the Four Square stamp set,  which retired last month, along with Chocolate Chip ribbon, Old Olive, Really Rust, Chocolate Chip, and Not Quite Navy card stock, and Chocolate Chip & Really Rust ink pads.

I'm working on my Christmas in July Class and hope to have some of those projects posted soon!  Stay tuned! 

Happy Stampin!

Wednesday, July 7, 2010

Surprise...or close to it!

Yesterday I mentioned in my post that we celebrated my mother's 60th birthday with a surprise party.  Well, we tried to keep her away all day, but she came home an hour before the party started.  Normally this would make me sad, but she was still completely surprised to drive up to a decorated driveway full of tables, chairs, and a few streamers.  The best part was seeing her face when she saw her sister and brother come walking out of the house.  They both live in other states and came to town just for her party!!  Oh so special, fun, and surprising :) 

To prepare for the party, my main job was to get the invitation made and sent out.  So....I just had to use the Stampin' Up My Digital Studio program.  This was my 2nd or 3rd invitation using the program, and I'm still in love with it!  A normal person could make this card in about 10-15 minutes.  Since I don't consider myself normal, it took me about 1 to 1 1/2 hours.  I just kept playing with different options which is probably one of the coolest parts of the program...there are soooo many options!

I know I know...I'm rambling and you just want to see the invitation :)


The invitation was printed 4 to a page on 8 1/2 x 11 white card stock and mailed as a postcard.  For those guests whom I had email addresses for, I simply emailed them the invitation as an attachment.

I need to start using MDS for scrap booking now since I've mastered the whole card making side of things.  Hmmm...what picture should I start with....decisions decisions.

Happy Stampin!

Tuesday, July 6, 2010

Black Magic in Not Quite Navy...so for me Navy Magic?

I must say, the past few days are a complete blur.  Our family surprised my mother on Friday for her 60th birthday.  Between coordinating her being out of the house, setting up tables, decorating, chopping food etc etc and serving about 100 people, the day was a long one, but TOTALLY worth it.  My mother is a total jewel and I appreciate her so much.  I know you all probably have wonderful mothers as well, but mine is just a bit more awesome than any other...ok yes, I am totally biased.

I made her a bday card using the black magic technique and of course in all the rush of things forgot to take a picture of it.  So, instead I'll share a card I made for Jamie (aka girl in the photo with me who hardly EVER blogs but I still *heart* her).  For my mom's card, I actually used black card stock but for Jamie's I felt like it would be too much contrast with the DS paper I picked out.  So, I went with Not Quite Navy. 


Steps to Create the Cuteness:
1.  Stamped the Inspired by Nature flowers using white craft ink and let dry...well..or get impatient and use a heat gun to speed up the process.
2.  Color image with SU colored pencils starting with the lighter colors and working my way out to the darker tones.
3.  Use a white gel pen to create extra highlights around the flowers and leaves/stems. 
4.  After cutting out my DS paper, flip it over repeatedly in trying to decide which side I like best. 
5.  Cut off bottom half of my stamped card stock in realizing it won't all fit on my card.  I even contemplated slicing through the whole thing to create that cool effect that some people do, but I was simply to scared to do it after all that coloring.
6.  Add a so saffron bow to make it even more cute, but I'm still not totally satisfied with how my bow tying came out.
7.  Take a deep breath, and glue it all down.

Jamie loved the card.  Mom loved the card.  I love the technique and will probably have to demo it at my next club meeting.  Oh so fun.

Happy Stampin'!!

Products Used (All Stampin' Up):
DS Paper (Retired), Colored Pencils, White Craft Ink, White Gel Pen, So Saffron Ribbon (Retired)